Showing posts with label baking. Show all posts

Thursday, September 27, 2012

Best Ever Blueberry Muffins

I'm getting ready for a play date this afternoon. My 4-year-old daughter's favorite friend from school is coming over and it's a BIG DEAL. Let's just say she's borderline obsessed with her. She's been begging to have this lovely little girl come over for weeks now and has been on the verge of exploding with excitement ever since I told her a couple days ago that it was was going to finally happen. 

I am baking the girls some blueberry muffins. I found this recipe on the web. Hopefully they will turn out good and I won't embarrass my daughter. Haha!

UPDATE: So the muffins turned out great! Absolutely delicious. The play date was a success as well. My daughter's friend does not like blueberries. Doh!

Best Ever Blueberry Muffins

Makes 12-16 standard size muffins  

Adapted by Foodism Mom from a recipe by Mary Hunt of Everyday Cheapskate


Muffins
8 tablespoons unsalted butter (1 stick), softened to room temperature
1 cup granulated sugar
2 extra-large eggs
1 teaspoon pure vanilla extract
1/2 cup plain almond milk (or regular milk)
2 cups all-purpose flour
2 teaspoons baking powder
1/4 teaspoon salt
2 cups blueberries (fresh or frozen)

Topping
1 tablespoon granulated sugar
1/4 teaspoon cinnamon

Preheat oven to 375F.

Prepare a 12-cup muffin pan by spraying well with baking spray or line each cup with a cupcake liner.

In a medium bowl, whisk together the flour, baking powder, and salt; set aside.  Using a fork, mash 1/2 cup of blueberries; set aside. In a small bowl, mix together 1 tablespoon granulated sugar and nutmeg; set aside.

Using a hand mixer, cream butter and 1 cup sugar together in a medium bowl until creamy and light in color; add eggs, vanilla, and 1/2 cup of mashed blueberries.  Add 1/2 of the flour mixture; mix just until the dry ingredients are incorporated.  Add 1/2 of the milk and mix just until combined. Repeat with the remaining flour mixture, followed by the remaining milk. Fold in the remaining whole blueberries. Portion batter evenly into muffin cups and sprinkle with sugar/cinnamon topping. Bake 25-30 minutes, until a toothpick comes out clean.

Mary's Note:  Mary says you can freeze the muffins for up to two months before baking - portion the batter into foil-lined muffin pan and place in the freezer until the batter is firm, then pop the frozen muffins out of the pan and store in a freezer-safe container.  When you want freshly baked muffins, simply pop the frozen batter-filled foil cups back into a muffin pan and bake as directed; adding 5-6 minutes to the total baking time.

Friday, August 19, 2011

Strawberry Summer Cake

My mother-in-law loves strawberries. One of the many things we have in common! When I went to make a cake for her birthday dinner, I knew it had to incorporate this delectable summer fruit. I found this recipe on The Smitten Kitchen blog.

Strawberry Summer Cake
adapted from Martha Stewart by Smitten Kitchen
  • 1 1/2 cups (188 grams) all-purpose flour (can swap 3/4 cup or 94 grams all-purpose flour with 3/4 cup or 75 grams of barley flour, see Note)
  • 1 1/2 teaspoons baking powder
  • 1/2 teaspoon table salt
  • 6 tablespoons unsalted butter, at room temperature, plus extra for pie plate
  • 1 cup (200 grams) plus 2 tablespoons (25 grams) granulated sugar
  • 1 large egg
  • 1/2 cup (118 ml) milk
  • 1 teaspoon (5 ml) vanilla extract
  • 1 pound (or as many will fit!) strawberries, hulled and halved
Preheat oven to 350°F. Butter a 10-inch pie pan. This cake does not work in a standard 9-inch pie pan; it will overflow. Big apologies to anyone who learned the hard way! This cake would work, however, in a 9- or 10-inch springform or cake pan. The 10-inch would make a thinner cake than pictured.
Whisk flour or flours, baking powder and salt together in a small bowl. In a larger bowl, beat butter and 1 cup sugar until pale and fluffy with an electric mixer, about 3 minutes. Mix in egg, milk and vanilla until just combined. Add dry mixture gradually, mixing until just smooth.
Pour into prepared pie plate.

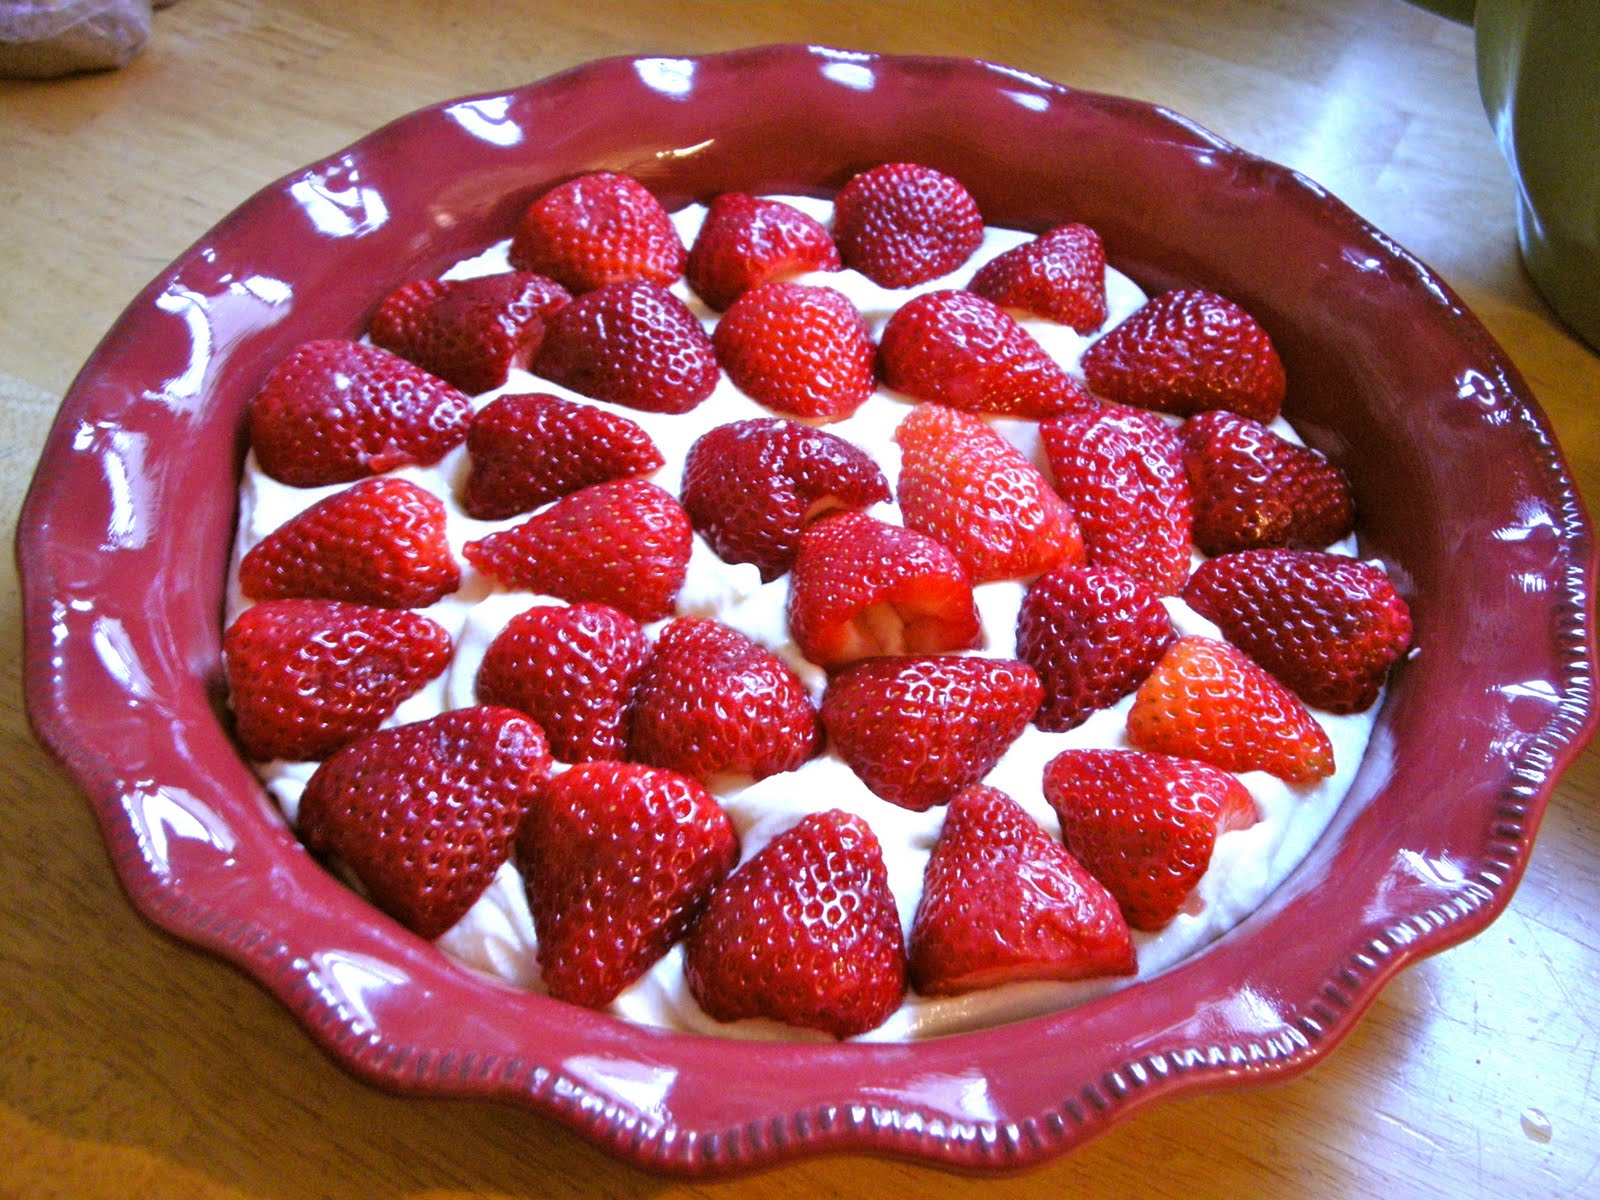
Arrange strawberries, cut side down, on top of batter, as closely as possible in a single layer (though I had to overlap a few to get them all in). Sprinkle remaining 2 tablespoons sugar over berries (I only used about 1 1/3 tbsp sugar and I thought it was plenty).
Bake cake for 10 minutes then reduce oven temperature to 325°F and bake cake until golden brown and a tester comes out free of wet batter, about 50 minutes to 60 minutes. (Gooey strawberries on the tester are a given.) Let cool in pan on a rack. Cut into wedges. Serve with lightly whipped cream (or vanilla ice cream).
Do ahead: Cake can be stored at room temperature for up to 2 days, loosely covered.

Friday, July 22, 2011

Chicken Pot Pie

Whenever I make roast chicken or buy one pre-cooked, I like to get one on the larger side. That way there is plenty for dinner that night and enough leftover meat to make something out of it another night. Two dishes you'll usually find me making with the leftovers are chicken noodle soup and chicken pot pie.

One short cut I take when making the pot pie is using a frozen pie crust. If you find a really good one, it can be almost as good as making one from scratch. Big time saver too, leaving you more time to spend with your family!
Chicken Pot Pie
  • 3 cups roasted chicken meat, 1/2 to 3/4 inch dice
  • 2 1/2 cups chicken broth
  • 1 chicken bouillon cube
  • 6 tablespoons (3/4 stick) unsalted butter
  • 1 yellow onion, chopped small
  • 1/3 cup all-purpose flour
  • 1/4 cup heavy cream
  • 2 large carrots; peeled, medium-diced, blanched for 2 minutes
  • 1 cup organic frozen peas, thawed and drained
  • 1 frozen pie crust, thawed out
In a small saucepan, heat up the chicken stock and dissolve the bouillon cube in the stock. You want the stock hot but not boiling. In a large pot or Dutch oven, melt the butter and saute the onions over medium-low heat for about 7 minutes, until translucent. Add the flour and cook over low heat, stirring constantly, for 2 minutes. Add the hot chicken stock to the sauce. Simmer over low heat for 1 more minute, stirring, until thickened and there are no more flour lumps. Add heavy cream and salt and pepper to taste. Start with no more than a teaspoon of salt and add on from there. Stir in the cubed chicken, carrots and peas.

Preheat the oven to 375 degrees F.

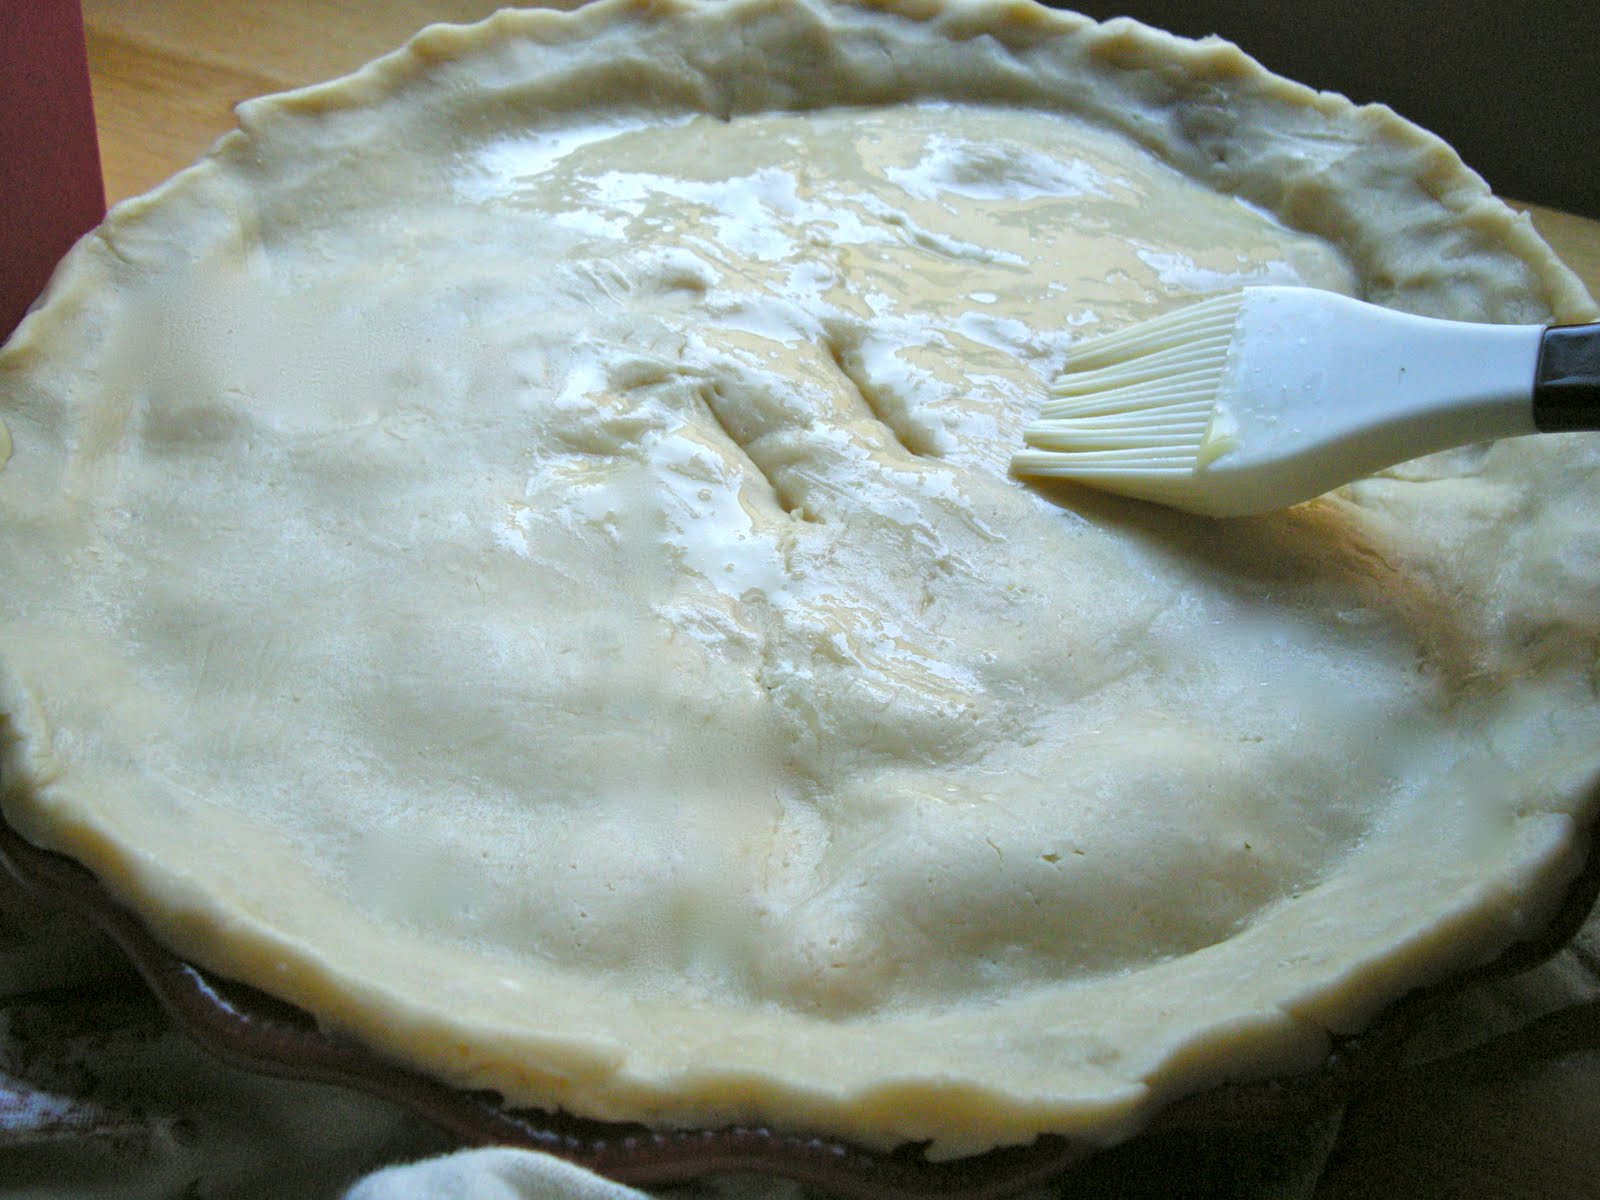
Put the filling into a large pie dish. Lay the defrosted pie crust on top of the filling. Pinch down the dough all around to seal.

Brush the dough with egg wash and make a couple slits into the top. Place on a baking sheet and bake for 45 minutes, or until the top is golden brown and the filling is bubbling.

Cool Tools:

Friday, July 15, 2011

Peach Crostata

I had some girlfriends over for dinner last week. I hadn't planned well for dessert but had a bunch of gorgeous summer peaches on hand. I also keep frozen pie crusts in the freezer at all times. This would be enough to throw together a crostada. What I love about a crostada is that it's done in free form. Since I'm not a great baker, "free form" is right up my alley! I was able to put it together in just a few minutes. The results were rustic and delicious!!!

Peach Crostata

Ingredients

  • 1 good frozen pie crust, thawed out (still cold but soft enough to handle)
  • 1 egg
  • sugar
Filling:
    • 4 large ripe peaches, pitted and sliced into eighths
    • 1/2 lemon, juiced
    • 2 tbsp sugar
    • 1/2 tsp cinnamon
    • 2 tsp all-purpose flour

    Directions

    Preheat oven to 375 degrees F.

    To make the filling, gently toss the peaches, lemon juice, sugar, cinnamon and flour in a large mixing bowl until fruit is coated evenly. Set aside.

    To make an egg wash, beat the egg in a small bowl with a tablespoon of water. Set aside.

    Transfer the thawed out pie crust to a baking sheet. Spoon the fruit mixture into the center of the dough, leaving a 2-inch border all around. Then brush the border with the egg wash and lift the edge of crust over the filling, leaving the fruit exposed in center. Pinch the dough to seal any cracks. Brush the crust with the remaining egg wash and sprinkle with a tablespoon of sugar.

    Bake the crostata for 30 to 40 minutes or until the crust is golden brown and fruit is bubbly and tender.

    Serve warm or at room temperature with vanilla ice cream.

    Thursday, May 26, 2011

    Old-fashioned Sugar Cookies

    My wonderful mother-in-law made these cookies for us a while ago and I have to say, they are my new favorite cookie! So light, a little hint of lemon and perfect amount of sweet.

    Thanks, Mom! Love you.


    Old-fashioned Sugar Cookies

    Makes about 20 (3 1/2 inch) cookies.

    3 cups all-purpose flour
    1 tsp baking soda
    1/4 tsp salt
    1 3/4 cups granulated sugar
    1/4 cup packed light brown sugar
    1 tbsp finely grated lemon zest, plus 1 tbsp fresh lemon juice
    1 cup (2 sticks) unsalted butter, softened
    2 large or extra large eggs
    Sanding sugar, for sprinkling (optional, I left this out)

    1. Preheat oven to 350 degrees F. Sift flour, baking soda, and salt into a bowl; set aside.

    2. Put sugars and lemon zest in the bowl of an electric mixer fitted with the paddle attachment. Mix on medium speed 30 seconds. Add butter; mix until pale and fluffy, about 1 minute. Mix in eggs, 1 at a time, and then the lemon juice. Reduce speed;gradually add flour mixture, and mix until just combined.

    3. Scoop dough using a 2-inch ice cream scoop; space cookies 2 inches apart on parchment-lined baking sheets. Flatten cookies slightly with a spatula. Sprinkle tops with sanding sugar, then lightly brush with wet pastry brush; sprinkle with more sanding sugar.
    4. Bake cookies until golden, about 15 minutes. Let cool on sheets on wire racks for five minutes. Transfer cookies to racks using a spatula; let cool completely. Cookies can be stored in an airtight container at room temperature up to 3 days.

    *I make them with a 1 1/2 tbsp cookie scoop and bake them for about 10 to 11 minutes or until just golden around the edges.

    Cool Tools:

    Monday, January 10, 2011

    Best Rolled Sugar Cookies


    The holidays are over but it's been hard for me to let go. I took down my tree on January 2nd, the Santa cookie jar has been put away and the wreath on my door has been replaced by a non-seasonal welcome sign. It's the holiday-style eating that I can't seem to shake!

      I think I have developed some sort of addiction to eating rich, salty or fried foods and especially desserts. Today will be no exception. I have decided to make a nice sugar cookie dough so that the kids and I can make fun cutout cookies. But instead of gingerbread people and candy cane shapes, we will be making butterflies and animals. Hey, it's a start.

      I found a great sugar cookie dough online. I was able to make some cookies and put the remaining dough in the refrigerator. Now I can have fresh baked cookies whenever we want. Wait, that may not be the best thing for my waistline.
      Ingredients:
      3/4 cup butter, softened
      1 cup white sugar
      2 eggs
      1/2 teaspoon vanilla extract
      2-1/2 cups all-purpose flour
      1 teaspoon baking powder
      1/2 teaspoon salt
       

      Directions:
      You have scaled this recipe's ingredients to yield a new amount (30). The directions below still refer to the original recipe yield (60).
      1. In a large bowl, cream together butter and sugar until smooth. Beat in eggs and vanilla. Stir in the flour, baking powder, and salt. Cover, and chill dough for at least one hour (or overnight).
      2. Preheat oven to 400 degrees F (200 degrees C). Roll out dough on floured surface 1/4 to 1/2 inch thick. Cut into shapes with any cookie cutter. Place cookies 1 inch apart on ungreased cookie sheets.
      3. Bake 6 to 8 minutes in preheated oven. Cool completely.


       Cool Tools:

      Monday, December 13, 2010

      Chocolate Hazelnut Crinkle Cookies

      One of my favorite friends is a fellow mom from my four-year-old's preschool. Hi, Beth!

      She is smart, funny and super creative. She writes a great blog called Remarkably Domestic and makes the cutest barrettes I have ever seen! Yes, I am going to plug everything she does because I am such a fan. Sorry, if I'm embarrassing you now, B!

      A couple days ago I had the pleasure of attending her fifth annual "cookie exchange". Basically, everyone brings five dozen homemade cookies of their choice. At the party we all sampled each other's wares and if that wasn't awesome enough, then we got to take home several cookies of each kind. The remaining cookies were dropped off at a shelter (which was actually the best part).

      Here was my contribution, which I found on the Epicurious website. I picked them because they sounded elegant and looked very "holiday cookie" to me.
       

      Chocolate Hazelnut Crinkle Cookies

      Gourmet | December 2006
      These classic rich, chewy cookies crack — or, yes, crinkle — as they bake. Hazelnuts, cocoa, and chocolate come together to make them particularly potent.
      Yield: Makes about 7 dozen cookies
      Active Time: 30 min
      Total Time: 4 hr

      ingredients
      2/3 cup hazelnuts
      2 tablespoons granulated sugar
      6 oz fine-quality bittersweet
      chocolate (no more than 60% cacao if marked), finely chopped
      2 3/4 cups all-purpose flour
      2 tablespoons unsweetened cocoa powder
      2 teaspoons baking powder
      3/4 teaspoon salt
      1 stick (1/2 cup) unsalted butter, softened
      1 1/2 cups packed light brown sugar
      2 large eggs
      1/4 cup whole milk
      1 teaspoon pure vanilla extract
      3/4 cup confectioners sugar

      Special equipment: parchment paper
      preparation
      Make dough:
      Put oven rack in middle position and preheat oven to 350°F.

      Toast hazelnuts in a shallow baking pan in oven until skins split and nuts are pale golden, about 10 minutes. Remove from oven (turn oven off), then wrap hazelnuts in a kitchen towel and rub to remove any loose skins. Cool nuts completely. Pulse nuts with granulated sugar in a food processor until finely chopped.

      Melt chocolate in a metal bowl set over a saucepan of barely simmering water or in top of a double boiler, stirring until smooth. Remove bowl from heat and set aside.

      Whisk together flour, cocoa powder, baking powder, and salt in a bowl.

      Beat together butter and brown sugar in another bowl with an electric mixer at medium-high speed until creamy, about 3 minutes. Add eggs 1 at a time, beating well after each addition, then beat in melted chocolate until combined. Add milk and vanilla, beating to incorporate. Reduce speed to low and add flour mixture, mixing until just combined. Stir in nut mixture. Cover bowl with plastic wrap and chill dough until firm, 2 to 3 hours.

      Form and bake cookies:
      Put oven racks in upper and lower thirds of oven and preheat oven to 350°F. Line 2 large baking sheets with parchment paper.

      Sift confectioners sugar into a bowl. Halve dough and chill 1 half, wrapped in plastic wrap. Roll remaining half into 1-inch balls, placing them on a sheet of wax paper as rolled.
      Roll balls, 3 or 4 at a time, in confectioners sugar to coat generously
      and arrange 2 inches apart on lined baking sheets.

      Bake, switching position of sheets halfway through baking, until cookies are puffed and cracked and edges feel dry (but centers are still slightly soft), 12 to 18 minutes total.
      Transfer cookies to racks to cool completely.

      While first batch is baking, roll remaining dough into balls. Line cooled cookie sheets with fresh parchment, then coat balls with confectioners sugar and bake in same manner.

      Cooks' note:
      Cookies keep, layered between sheets of parchment or wax paper, in an airtight container at room temperature 5 days.

      Cool Tools:

      Monday, November 29, 2010

      The Best Banana Bundt Cake

      I had four bananas that were so ripe that I thought they might turn into goo if I let them go one more day. Usually I would make a banana bread and call it a day. Today I just wasn't feeling it. I was concerned that I might fall asleep from boredom if I made one more banana bread. There had to be something else I could do with the bananas. 

      I snooped around the internet and found The Best Banana Bundt Cake recipe by Dorie Greenspan. It had great reviews and I had everything I needed in my pantry.  

      It came out beautifully. A moist cake that was lighter than my usual banana bread. My only issue was,  I was so excited to slice and eat it that I forgot to take a picture until much later. So here are photos of less than half the cake!

      The Best Banana Bundt Cake 

      By Dorie Greenspan

      Ingredients

        • 3 cups all-purpose flour
        • 2 teaspoons baking soda
        • 1/2 teaspoon salt
        • 8 ounces unsalted butter, at room temperature ( 1/2 cup or 2 sticks)
        • 2 cups sugar
        • 2 teaspoons pure vanilla extract
        • 2 large eggs, preferably at room temperature
        • about 4 very ripe bananas, mashed ( 1 1/2 - 1 3/4 cups)
        • 1 cup plain yogurt (or a combination of the two) or 1 cup sour cream ( or a combination of the two)

      Directions

      1. Center a rack in the oven and preheat to 350°F Generously butter a 9- to 10-inch (12 cup) Bundt pan. (If you use a silicone pan there's no need to butter it.) Don't place the pan on a baking sheet - you want the oven's heat to circulate through the Bundt's inner tube.
      2. Whisk the flour, baking soda and salt together.
      3. Working with a stand mixer, preferably fitted with a paddle attachment, or with a hand mixer in a large bowl, beat the butter until creamy. Add the sugar and beat at medium speed until pale and fluffy. Beat in the vanilla, then add the eggs one at a time, beating for about 1 minute after each egg goes inches Reduce the mixer speed to low and mix in the bananas. Finally, mix in half the dry ingredients (don't be disturbed when the batter curdles), all the sour cream and then the rest of the flour mixture. Scrape the batter into the pan, rap the pan on the counter to debubble the batter and smooth the top.
      4. Bake for 65-75 minutes, or until a thin knife inserted deep into the center of the cake comes out clean. Check the cake after about 30 minutes - if it is browning too quickly, cover it loosely with a foil tent. Transfer the cake to a rack and cool for 10 minutes before unmolding onto the rack to cool to room temperature. If you have time, wrap the cooled cake in plastic and allow it to sit overnight before serving - it's even better the next day.
      5. OPTIONAL LEMONY WHITE ICING: Sift 3/4 cup confectioners' sugar into a bowl and squeeze in enough fresh lemon juice (start with 2 teaspoons and add more by drops) to make an icing thin enough to drizzle down the Bundt's curves.
      6. MUFFIN OPTION: Halve the recipe. You can add nuts or chocolate chips. Bake 28-32 minutes. Yields 12 muffins. 
      Cool Tools:

      Wednesday, November 17, 2010

      Fingerling Potato and Leek Quiche

      One of my new favorite things to make (and eat) is quiche. I had only made my first one a few months ago but I think I've made about eight since. 

      They have all been the same kind though -spinach and mushroom. I guess I knew it would turn out good every time so I hadn't strayed.

      Well, I finally worked up the courage to try something different. This morning's experiment? Quiche with fingerling potatoes and leeks!
      Fingerling Potato and Leek Quiche
      • 1 tbsp butter
      • 1/2 tbsp olive oil
      • 1/2 lb fingerling or yukon gold potatoes, scrubbed clean
      • 2 medium leeks; tougher outer layers removed, rinsed of any dirt, light green and white part sliced into 1/2 inch slices
      • 1/4 cup white wine
      • Salt and pepper
      • 1 1/2 cups shredded Swiss and/or Gruyere cheese 
      • 6 jumbo eggs, beaten
      • 3/4 cup heavy cream
      • 1 pie crust(homemade or store-bought frozen), fitted to a glass pie plate or 10 inch tart pan

      Directions

      If you are using a frozen pie crust, let the dough defrost a bit by letting it sit in room temperature.

      When it has softened, place the dough into your tart pan or pie plate and spread out the dough with your fingers until it fits the pan all the way up to the edges. Then leave it the fridge until you are ready to fill and bake it.

      Cook your potatoes by either boiling them for about 20 minutes or until you can pierce them easily with a fork. Or you can put them in a covered glass dish with a couple tablespoons of water and microwave them for about 4 minutes. You want them tender but still firm. Set aside to cool. Cut them into 1/4 inch slices when they are cool enough to handle.

      Preheat the oven to 375 degrees F.
      Heat up a medium pan over medium heat. When pan is hot add the butter, olive oil,leeks and 1/4 tsp salt. Cook leeks for 5 minutes. Stirring often and pressing down on them so that all the layers separate and cook evenly. Then add the wine and cook, stirring occasionally, for 2 minutes more or until it evaporates and leeks are soft. Set aside in a bowl to cool.
      You should now have about 1 cup of cooked leeks and 2 cups of sliced potatoes.

      Combine the eggs, cream, 1/2 teaspoon salt and 1/4 teaspoon pepper in a food processor or blender. Blend for about 15 seconds.
      Pour a small amount of egg mixture into the pie dish, just enough to cover the bottom. Then evenly layer the potatoes,
      then the leeks and then cheese in the bottom of the pie crust.  Pour the remaining egg mixture on top until it fills the tart pan almost to the top of the crust line without overflowing. Place on a baking sheet (in case it does overflow) and into the oven for about 40 minutes or until the egg mixture is firm and the top is golden brown. Cut into 6-8 pieces. Serve hot or room temperature.

      Cool Tools:

      Monday, September 27, 2010

      Chicks in a Blanket

      So here is the recipe for the appetizers I made for the Hollywood Bowl last week. 


      My darling friend Kathryn was a pescetarian for as long as I can remember. Meaning she ate seafood but no other meats. Just recently, she has been dabbling in poultry. It's been fun cooking chicken for her!


      These "chicks" in a blanket are my version of pigs in a blanket but I substituted the traditional pork sausage with chicken sausage. They were decadent and very tasty. 
       

      Chicks in a Blanket

          •    frozen (or homemade) puff pastry dough, defrosted slightly but still very cold
          •    shredded Gruyere cheese
          •    1 large chicken sausage (I used a smoked apple chardonnay kind), cut into 8 pieces lengthwise

      Preheat oven to 350 degrees F.
      Lightly flour a smooth and clean work surface. Place your cold pastry dough down and use a 2 to 2 1/2 inch diameter round cookie cutter to cut out eight circles.
      Sprinkle a little cheese onto each circle, then a piece of sausage. Fold the edges over one another and press together well to seal.
      Place all of the finished pieces onto a baking sheet lined with parchment paper or baking mat and bake for 20-25 minutes or until golden brown.

      Allow to cool for ten minutes before serving or you will have some burnt mouths!


      Cool Tools:

      Monday, August 9, 2010

      Crunchy Top Banana Nut Muffins

      Lately I've been making a conscious effort not to waste food. I am proud to report of a "killing of two birds with one stone" incident (I do not actually condone bird killing by the way).

      We occasionally have granola for breakfast. Problem is, there is always a large amount of crumbs left at the bottom of the box. So instead of throwing out almost two cups of granola crumbs, I poured them all into a Ziploc bag and vowed to use them in some sort of baking.

      Well today I had three super ripe bananas that needed to be used immediately or end up in the trash tomorrow morning. I usually make a banana bread but I thought muffins would be more fun for the kids. Then I remembered those crumbs. What a great crunchy topping they would make!


      Crunchy Top Banana Nut Muffins
      • 1/2 cup (1 stick) unsalted butter
      • 2 eggs (large or extra-large), lightly beaten
      • 1/2 cup sour cream or plain yogurt
      • 3 LARGE, very ripe bananas, mashed
      • 2 tsp vanilla
      • 2 cups of flour
      • 3 tbsp ground flaxseed meal (optional)
      • 3/4 cup sugar
      • 3/4 tsp baking soda
      • 1/2 tsp salt
      • 3/4 cup chopped walnuts or pecans, lightly toasted
      Crumb topping (optional)
      • 3/4 cup granola crumbs (or ground up granola) 
      • 1 tbsp sugar

      Adjust the oven rack to the lower-middle position. Preheat oven to 375 degrees F.

      Melt the butter. A large glass mixing bowl in the microwave works great. Set aside to cool. In the meantime; whisk the flour, flaxseed, sugar, baking soda and salt together in a separate mixing bowl. Set aside

      Add the mashed bananas, sour cream/yogurt, eggs and vanilla to the melted butter bowl. Mix well. Next add the dry ingredients and walnuts to the bowl and fold until just combined. Don't over mix. Pour the mixture into lined muffin pans, a large cookie scoop works well for this.

      Mix the granola and tablespoon of sugar together in a bowl.
      Sprinkle some of the mixture on top of each muffin.

      Bake for 20-25 minutes. If a toothpick comes out clean then they're done. If not, then bake for a few more minutes.

      Let cool for 5 minutes. Remove muffins from the pan and place them on a cooling rack.

      Cool Tools:


      Tuesday, August 3, 2010

      Chocolate Chip Pecan Oatmeal Cookies

      Here is a variation of those delicious Raisin Pecan Oatmeal Cookies I made the other day. I made them a little less oatmeal-y and substituted chocolate chips for the raisins. A truly awesome cookie!

      Chocolate Chip Pecan Oatmeal Cookies
      • 1 cup pecans
      • 1/4 pound (1 stick) unsalted butter, at room temperature
      • 1/2 cup dark brown sugar, lightly packed
      • 1/2 cup granulated sugar
      • 1 extra-large egg, at room temperature
      • 1 teaspoons pure vanilla extract
      • 3/4 cup all-purpose flour 
      • 1 tbsp toasted flaxseed (optional)
      • 1/2 teaspoon baking powder
      • 1/2 teaspoon ground cinnamon
      • 1/2 teaspoon kosher salt
      • 1 1/4 cups old-fashioned oatmeal 
      • 3/4 cup chocolate chips

      Directions

      Preheat the oven to 350 degrees F.
      Place the pecans on a sheet pan and bake for 5 minutes, until crisp. You should just start to smell them. Mmmmm! Set aside to cool. Chop very coarsely.

      In the bowl of an electric mixer fitted with the paddle attachment or an electric hand mixer, beat the butter, brown sugar, and granulated sugar together on medium-high speed until light and fluffy. With the mixer on low, add the egg and the vanilla.

      Sift the flour, flaxseed, baking powder, cinnamon, and salt together into a medium bowl. With the mixer on low, slowly add the dry ingredients to the butter mixture. Add the oats and pecans and mix just until combined. Gently fold in the chocolate chips.
      Using a small ice-cream scoop or a tablespoon, drop 2-inch mounds of dough onto sheet pans lined with parchment paper.
      Flatten slightly with a damp hand. Bake for 12 to 14 minutes, until lightly browned. Transfer the cookies to a baking rack and cool completely.


      Cool Tools:
       

      Saturday, July 24, 2010

      Sweet somethings...

      For someone who is not much of a baker, I am onto my second baking post in a row.  I guess that's the only way you can get better at something...practice, practice, practice!

      This afternoon, the kids and I made some Raisin Pecan Oatmeal Cookies. They were amazing! A nice change from our usual chocolate chip.

      Raisin Pecan Oatmeal Cookies


      Ingredients


      • 1 1/2 cups pecans
      • 1/2 pound (2 sticks) unsalted butter, at room temperature
      • 1 cup dark brown sugar, lightly packed
      • 1 cup granulated sugar
      • 2 extra-large eggs, at room temperature
      • 2 teaspoons pure vanilla extract
      • 1 1/2 cups all-purpose flour
      • 1 teaspoon baking powder
      • 1 teaspoon ground cinnamon
      • 1 teaspoon kosher salt
      • 3 cups old-fashioned oatmeal
      • 1 1/2 cups raisins

      Directions

      Preheat the oven to 350 degrees F.
      Place the pecans on a sheet pan and bake for 5 minutes, until crisp. Set aside to cool. Chop very coarsely.

      In the bowl of an electric mixer fitted with the paddle attachment, beat the butter, brown sugar, and granulated sugar together on medium-high speed until light and fluffy. With the mixer on low, add the eggs, one at a time, and the vanilla.

      Sift the flour, baking powder, cinnamon, and salt together into a medium bowl. With the mixer on low, slowly add the dry ingredients to the butter mixture. Add the oats, raisins, and pecans and mix just until combined.
      Using a small ice-cream scoop or a tablespoon, drop 2-inch mounds of dough onto sheet pans lined with parchment paper. Flatten slightly with a damp hand. Bake for 12 to 15 minutes, until lightly browned. Transfer the cookies to a baking rack and cool completely.


      Cool Tools:

      Friday, July 23, 2010

      Romancing the plum...

      I love to read cooking magazines. My favorites are the ones with beautiful photos and art direction. Oh, and of course tempting recipes. I enjoy them like a good romance novel. Except the love affair is with food!

      While flipping through the latest Martha Stewart Living the other day, I came across the most charming looking cake. The whole cake was cooked in a cast iron pan/skillet and had fresh plums fanned across the top. It seemed old-fashioned and almost...romantic!

      I asked my almost-too-good-to-be-true mother-in-law to assist me with the skillet cake while I finished making dinner. Well before you know it, she was done and I hadn't done a thing to help. 

      We served it warm with a scoop of vanilla ice cream. The plums added a little tartness and the cake was soft in the middle, crispier towards the edge. It was wonderful. Thanks, Mom!
      Plum Skillet Cake

      Martha Stewart Living, August 2010

      • 4 tbsp unsalted butter, room temperature, plus more for skillet
      • 1 cup all-purpose flour, plus more for skillet
      • 1/2 tsp baking powder
      • 1/4 tsp baking soda
      • 1/2 tsp coarse salt
      • 3/4 cup plus 2 tablespoons sugar
      • 1 large egg
      • 1/2 cup low-fat buttermilk
      • 2 ripe medium plums, thinly sliced
      Preheat oven to 350 degrees F. Butter an 8 inch ovenproof skillet (preferably cast-iron); dust with flour, tapping out excess. Whisk together flour, baking powder, baking soda, and 1/2 teaspoon salt. Beat butter and 3/4 cup sugar with a mixer on medium speed until pale and fluffy. Beat in egg. Add flour mixture in 3 additions, alternating with buttermilk.

      Pour batter into prepared skillet and smooth top with an offset spatula. 

      Fan plums on top, and sprinkle with remaining 2 tablespoons sugar. Bake until golden brown and a toothpick inserted in the center comes out clean, 35 to 40 minutes. Let cool slightly.
      Cut into 6-8 wedges.


      Cool Tools:

      Tuesday, July 6, 2010

      Pizza party...

      I've had a pizza stone in my kitchen arsenal for years now. I figure close to ten years is long enough to sit around collecting dust. So tonight I used it and had a little pizza party with my family.
      The most intimidating part about homemade pizza is the dough. I thought I'd ease into things with store-bought dough.

      Trader Joe's sells fresh, ready-made pizza dough in regular AND whole wheat. I went with the whole wheat. I also didn't know how to make pizza sauce so I picked up some high quality marinara sauce. My topping choices were slices of fresh mozzarella, Calabrese salami, shitake mushrooms, slices of fresh tomato, fresh basil leaves and sweet onion.
      The kids had a blast making theirs. Some sauce, salami and mushrooms were all they wanted. My hubby and I made a classic Pizza Margherita...tomatoes, mozzarella and basil. As well as The Works which is what I will call our "everything on it" pizza.

      I have to say, the whole process was surprisingly easy. It did take some work to tame the dough. No, the amoeba-shaped pizzas were not intentional. But the rest was just opening a jar and slicing ingredients.

      Before prepping the pizzas, I placed my stone in the middle rack of the oven and set it to 450 degrees F.  I prepared each pizza right on a pizza peel (a wide paddle-like tool crucial in getting the pizzas safely and swiftly into the oven). I then slid the pizza onto the hot baking stone and baked for about ten minutes each. Sprinkling a little ground corn meal onto the peel before you put down the dough helps prevent sticking.
      Next step in pizza making, homemade dough and pizza sauce!

      Cool Tools: