I'm getting ready for a play date this afternoon. My 4-year-old daughter's favorite friend from school is coming over and it's a BIG DEAL. Let's just say she's borderline obsessed with her. She's been begging to have this lovely little girl come over for weeks now and has been on the verge of exploding with excitement ever since I told her a couple days ago that it was was going to finally happen.
I am baking the girls some blueberry muffins. I found this recipe on the web. Hopefully they will turn out good and I won't embarrass my daughter. Haha!
UPDATE: So the muffins turned out great! Absolutely delicious. The play date was a success as well. My daughter's friend does not like blueberries. Doh!
Best Ever Blueberry Muffins
Makes 12-16 standard size muffins
Adapted by Foodism Mom from a recipe by Mary Hunt of Everyday Cheapskate
Muffins
8 tablespoons unsalted butter (1 stick), softened to room temperature
1 cup granulated sugar
2 extra-large eggs
1 teaspoon pure vanilla extract
1/2 cup plain almond milk (or regular milk)
2 cups all-purpose flour
2 teaspoons baking powder
1/4 teaspoon salt
2 cups blueberries (fresh or frozen)
Topping
1 tablespoon granulated sugar
1/4 teaspoon cinnamon
Preheat oven to 375F.
Prepare a 12-cup muffin pan by spraying well with
baking spray or line each cup with a cupcake liner.
In a medium bowl, whisk together the flour, baking
powder, and salt; set aside. Using a fork, mash 1/2 cup of blueberries;
set aside. In a small bowl, mix together 1 tablespoon granulated sugar
and nutmeg; set aside.
Using a hand mixer, cream butter and 1 cup sugar together in a medium
bowl until creamy and light in color; add eggs, vanilla, and 1/2 cup of
mashed blueberries. Add 1/2 of the flour mixture; mix just until the
dry ingredients are incorporated. Add 1/2 of the milk and mix just
until combined. Repeat with the remaining flour mixture, followed by
the remaining milk. Fold in the remaining whole blueberries. Portion batter evenly into muffin cups and sprinkle with sugar/cinnamon
topping. Bake 25-30 minutes, until a toothpick comes out clean.
Mary's Note: Mary says you can freeze the muffins for up to two months
before baking - portion the batter into foil-lined muffin pan and place
in the freezer until the batter is firm, then pop the frozen muffins out
of the pan and store in a freezer-safe container. When you want
freshly baked muffins, simply pop the frozen batter-filled foil cups
back into a muffin pan and bake as directed; adding 5-6 minutes to the
total baking time.
This is a journal of my food escapades. I'm a real person and a busy mom here to offer up meal ideas to those searching for something new. I love food and the whole process of creating a meal. I rarely eat or make anything that I don't think is really delicious. Let's cook together! Please feel free to contact me at: foodismmom@me.com
Showing posts with label desserts. Show all posts
Thursday, September 27, 2012
Friday, August 19, 2011
Strawberry Summer Cake
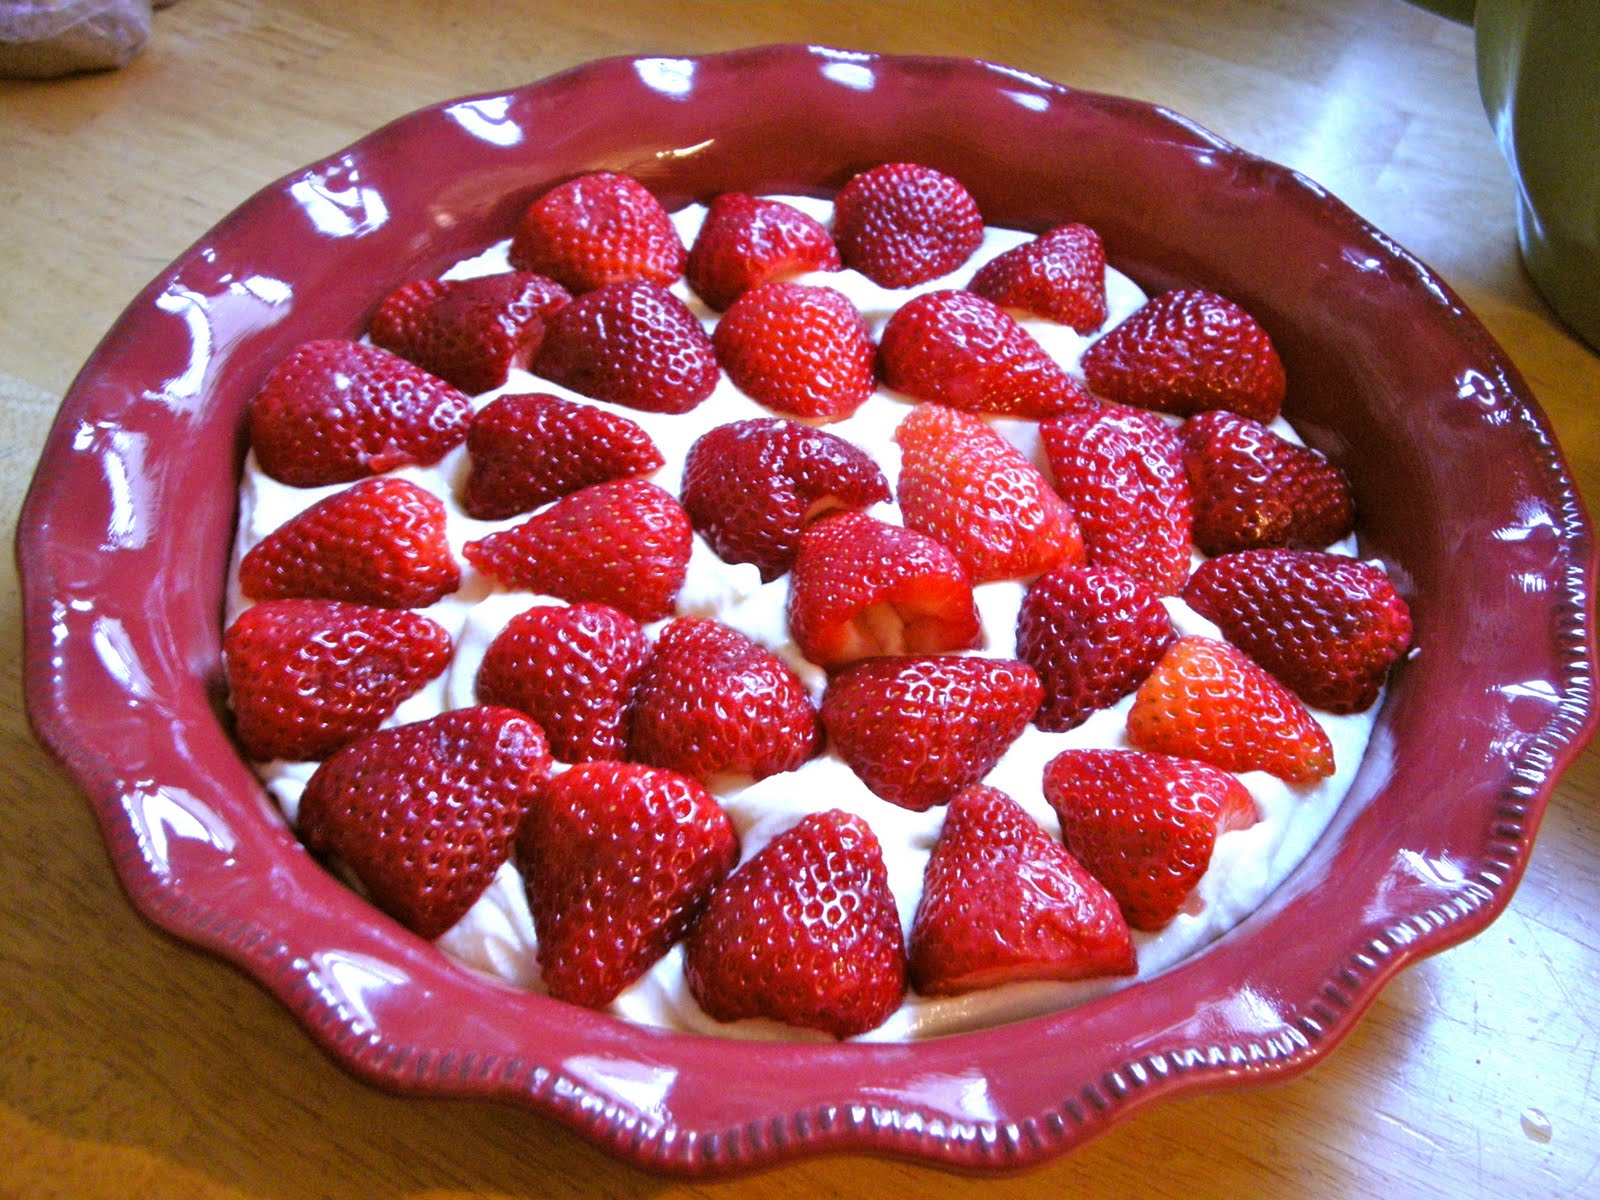
My mother-in-law loves strawberries. One of the many things we have in common! When I went to make a cake for her birthday dinner, I knew it had to incorporate this delectable summer fruit. I found this recipe on The Smitten Kitchen blog.
Strawberry Summer Cake
adapted from Martha Stewart by Smitten Kitchen
Whisk flour or flours, baking powder and salt together in a small bowl. In a larger bowl, beat butter and 1 cup sugar until pale and fluffy with an electric mixer, about 3 minutes. Mix in egg, milk and vanilla until just combined. Add dry mixture gradually, mixing until just smooth.
Pour into prepared pie plate.
Arrange strawberries, cut side down, on top of batter, as closely as possible in a single layer (though I had to overlap a few to get them all in). Sprinkle remaining 2 tablespoons sugar over berries (I only used about 1 1/3 tbsp sugar and I thought it was plenty).
Bake cake for 10 minutes then reduce oven temperature to 325°F and bake cake until golden brown and a tester comes out free of wet batter, about 50 minutes to 60 minutes. (Gooey strawberries on the tester are a given.) Let cool in pan on a rack. Cut into wedges. Serve with lightly whipped cream (or vanilla ice cream).
Do ahead: Cake can be stored at room temperature for up to 2 days, loosely covered.
Strawberry Summer Cake
adapted from Martha Stewart by Smitten Kitchen
- 1 1/2 cups (188 grams) all-purpose flour (can swap 3/4 cup or 94 grams all-purpose flour with 3/4 cup or 75 grams of barley flour, see Note)
- 1 1/2 teaspoons baking powder
- 1/2 teaspoon table salt
- 6 tablespoons unsalted butter, at room temperature, plus extra for pie plate
- 1 cup (200 grams) plus 2 tablespoons (25 grams) granulated sugar
- 1 large egg
- 1/2 cup (118 ml) milk
- 1 teaspoon (5 ml) vanilla extract
- 1 pound (or as many will fit!) strawberries, hulled and halved
Whisk flour or flours, baking powder and salt together in a small bowl. In a larger bowl, beat butter and 1 cup sugar until pale and fluffy with an electric mixer, about 3 minutes. Mix in egg, milk and vanilla until just combined. Add dry mixture gradually, mixing until just smooth.
Pour into prepared pie plate.
Arrange strawberries, cut side down, on top of batter, as closely as possible in a single layer (though I had to overlap a few to get them all in). Sprinkle remaining 2 tablespoons sugar over berries (I only used about 1 1/3 tbsp sugar and I thought it was plenty).
Bake cake for 10 minutes then reduce oven temperature to 325°F and bake cake until golden brown and a tester comes out free of wet batter, about 50 minutes to 60 minutes. (Gooey strawberries on the tester are a given.) Let cool in pan on a rack. Cut into wedges. Serve with lightly whipped cream (or vanilla ice cream).
Do ahead: Cake can be stored at room temperature for up to 2 days, loosely covered.
Friday, July 15, 2011
Peach Crostata
I had some girlfriends over for dinner last week. I hadn't planned well for dessert but had a bunch of gorgeous summer peaches on hand. I also keep frozen pie crusts in the freezer at all times. This would be enough to throw together a crostada. What I love about a crostada is that it's done in free form. Since I'm not a great baker, "free form" is right up my alley! I was able to put it together in just a few minutes. The results were rustic and delicious!!!
Peach Crostata
Ingredients
- 1 good frozen pie crust, thawed out (still cold but soft enough to handle)
- 1 egg
- sugar
- 4 large ripe peaches, pitted and sliced into eighths
- 1/2 lemon, juiced
- 2 tbsp sugar
- 1/2 tsp cinnamon
- 2 tsp all-purpose flour
Directions
Preheat oven to 375 degrees F.To make the filling, gently toss the peaches, lemon juice, sugar, cinnamon and flour in a large mixing bowl until fruit is coated evenly. Set aside.
To make an egg wash, beat the egg in a small bowl with a tablespoon of water. Set aside.
Transfer the thawed out pie crust to a baking sheet. Spoon the fruit mixture into the center of the dough, leaving a 2-inch border all around. Then brush the border with the egg wash and lift the edge of crust over the filling, leaving the fruit exposed in center. Pinch the dough to seal any cracks. Brush the crust with the remaining egg wash and sprinkle with a tablespoon of sugar.
Bake the crostata for 30 to 40 minutes or until the crust is golden brown and fruit is bubbly and tender.
Serve warm or at room temperature with vanilla ice cream.
Thursday, May 26, 2011
Old-fashioned Sugar Cookies
My wonderful mother-in-law made these cookies for us a while ago and I have to say, they are my new favorite cookie! So light, a little hint of lemon and perfect amount of sweet.
Thanks, Mom! Love you.
Old-fashioned Sugar Cookies
Makes about 20 (3 1/2 inch) cookies.
3 cups all-purpose flour
1 tsp baking soda
1/4 tsp salt
1 3/4 cups granulated sugar
1/4 cup packed light brown sugar
1 tbsp finely grated lemon zest, plus 1 tbsp fresh lemon juice
1 cup (2 sticks) unsalted butter, softened
2 large or extra large eggs
Sanding sugar, for sprinkling (optional, I left this out)
1. Preheat oven to 350 degrees F. Sift flour, baking soda, and salt into a bowl; set aside.
2. Put sugars and lemon zest in the bowl of an electric mixer fitted with the paddle attachment. Mix on medium speed 30 seconds. Add butter; mix until pale and fluffy, about 1 minute. Mix in eggs, 1 at a time, and then the lemon juice. Reduce speed;gradually add flour mixture, and mix until just combined.
3. Scoop dough using a 2-inch ice cream scoop; space cookies 2 inches apart on parchment-lined baking sheets. Flatten cookies slightly with a spatula. Sprinkle tops with sanding sugar, then lightly brush with wet pastry brush; sprinkle with more sanding sugar.
4. Bake cookies until golden, about 15 minutes. Let cool on sheets on wire racks for five minutes. Transfer cookies to racks using a spatula; let cool completely. Cookies can be stored in an airtight container at room temperature up to 3 days.
*I make them with a 1 1/2 tbsp cookie scoop and bake them for about 10 to 11 minutes or until just golden around the edges.
Cool Tools:
Thanks, Mom! Love you.
Old-fashioned Sugar Cookies
Makes about 20 (3 1/2 inch) cookies.
3 cups all-purpose flour
1 tsp baking soda
1/4 tsp salt
1 3/4 cups granulated sugar
1/4 cup packed light brown sugar
1 tbsp finely grated lemon zest, plus 1 tbsp fresh lemon juice
1 cup (2 sticks) unsalted butter, softened
2 large or extra large eggs
Sanding sugar, for sprinkling (optional, I left this out)
1. Preheat oven to 350 degrees F. Sift flour, baking soda, and salt into a bowl; set aside.
2. Put sugars and lemon zest in the bowl of an electric mixer fitted with the paddle attachment. Mix on medium speed 30 seconds. Add butter; mix until pale and fluffy, about 1 minute. Mix in eggs, 1 at a time, and then the lemon juice. Reduce speed;gradually add flour mixture, and mix until just combined.
3. Scoop dough using a 2-inch ice cream scoop; space cookies 2 inches apart on parchment-lined baking sheets. Flatten cookies slightly with a spatula. Sprinkle tops with sanding sugar, then lightly brush with wet pastry brush; sprinkle with more sanding sugar.
4. Bake cookies until golden, about 15 minutes. Let cool on sheets on wire racks for five minutes. Transfer cookies to racks using a spatula; let cool completely. Cookies can be stored in an airtight container at room temperature up to 3 days.
*I make them with a 1 1/2 tbsp cookie scoop and bake them for about 10 to 11 minutes or until just golden around the edges.
Cool Tools:
Friday, February 25, 2011
Waffle of Insane Greatness
My family and I just went through a fast and furious bout of the stomach flu. We are all feeling much better but there is still very little we can eat and keep down.
Strangely, I had this huge hankering for Belgian waffles. It may have had something to do with watching Bobby Flay whip up the most sinful looking waffles ever on the Food Channel. I think he must have used three stick of butter at the end of the day. As much as I love butter, I couldn't make that for my family in good conscience. So I found this recipe on the internet that wasn't low-fat by any means but a lot less trouble than I could have gotten in. Okay and how could you bypass a recipe that has "Waffle of Insane Greatness" as a title?
Waffle of Insane Greatness
Recipe courtesy Aretha Frankensteins
Ingredients
- 1 1/2 cups all-purpose flour
- 1/2 cup cornstarch
- 1 teaspoon baking powder
- 1/2 teaspoon baking soda
- 1 teaspoon salt
- 2 cup whole milk or buttermilk
- 2/3 cup vegetable oil
- 2 eggs
- 1 tablespoon sugar
- 1 1/2 teaspoon vanilla extract
- Butter and syrup, for serving
Directions
In a medium bowl, combine the flour, cornstarch, baking powder, baking soda, and salt; mix well. Add the milk, vegetable oil, egg, sugar and vanilla and mix well. Let the batter sit for 30 minutes.Preheat a waffle iron. *Do not use non-stick spray on the waffle iron; the oil in the batter will allow the waffle to release easily. Follow the directions on your waffle iron to cook the waffles. Serve immediately with butter and syrup.
* I ended up brushing a little vegetable oil onto my waffle maker before adding the batter. Depends on your waffle maker.
Cool Tools:
Monday, January 10, 2011
Best Rolled Sugar Cookies
The holidays are over but it's been hard for me to let go. I took down my tree on January 2nd, the Santa cookie jar has been put away and the wreath on my door has been replaced by a non-seasonal welcome sign. It's the holiday-style eating that I can't seem to shake!
I think I have developed some sort of addiction to eating rich, salty or fried foods and especially desserts. Today will be no exception. I have decided to make a nice sugar cookie dough so that the kids and I can make fun cutout cookies. But instead of gingerbread people and candy cane shapes, we will be making butterflies and animals. Hey, it's a start.
I found a great sugar cookie dough online. I was able to make some cookies and put the remaining dough in the refrigerator. Now I can have fresh baked cookies whenever we want. Wait, that may not be the best thing for my waistline.
- Best Rolled Sugar Cookies
- allrecipes.com
Ingredients:
3/4 cup butter, softened 1 cup white sugar 2 eggs 1/2 teaspoon vanilla extract 2-1/2 cups all-purpose flour 1 teaspoon baking powder 1/2 teaspoon salt |
Directions:
You have scaled this recipe's ingredients to yield a new amount (30). The directions below still refer to the original recipe yield (60).
| 1. | In a large bowl, cream together butter and sugar until smooth. Beat in eggs and vanilla. Stir in the flour, baking powder, and salt. Cover, and chill dough for at least one hour (or overnight). |
| 2. | Preheat oven to 400 degrees F (200 degrees C). Roll out dough on floured surface 1/4 to 1/2 inch thick. Cut into shapes with any cookie cutter. Place cookies 1 inch apart on ungreased cookie sheets. |
| 3. | Bake 6 to 8 minutes in preheated oven. Cool completely. |
Cool Tools:
Monday, December 13, 2010
Chocolate Hazelnut Crinkle Cookies
One of my favorite friends is a fellow mom from my four-year-old's preschool. Hi, Beth!
She is smart, funny and super creative. She writes a great blog called Remarkably Domestic and makes the cutest barrettes I have ever seen! Yes, I am going to plug everything she does because I am such a fan. Sorry, if I'm embarrassing you now, B!
A couple days ago I had the pleasure of attending her fifth annual "cookie exchange". Basically, everyone brings five dozen homemade cookies of their choice. At the party we all sampled each other's wares and if that wasn't awesome enough, then we got to take home several cookies of each kind. The remaining cookies were dropped off at a shelter (which was actually the best part).
Here was my contribution, which I found on the Epicurious website. I picked them because they sounded elegant and looked very "holiday cookie" to me.
Gourmet | December 2006
These classic rich, chewy cookies crack — or, yes, crinkle — as they bake. Hazelnuts, cocoa, and chocolate come together to make them particularly potent. Yield: Makes about 7 dozen cookiesActive Time: 30 min Total Time: 4 hr 2/3 cup hazelnuts 2 tablespoons granulated sugar 6 oz fine-quality bittersweet chocolate (no more than 60% cacao if marked), finely chopped 2 3/4 cups all-purpose flour 2 tablespoons unsweetened cocoa powder 2 teaspoons baking powder 3/4 teaspoon salt 1 stick (1/2 cup) unsalted butter, softened 1 1/2 cups packed light brown sugar 2 large eggs 1/4 cup whole milk 1 teaspoon pure vanilla extract 3/4 cup confectioners sugar Special equipment: parchment paper Make dough: Put oven rack in middle position and preheat oven to 350°F. Toast hazelnuts in a shallow baking pan in oven until skins split and nuts are pale golden, about 10 minutes. Remove from oven (turn oven off), then wrap hazelnuts in a kitchen towel and rub to remove any loose skins. Cool nuts completely. Pulse nuts with granulated sugar in a food processor until finely chopped. Melt chocolate in a metal bowl set over a saucepan of barely simmering water or in top of a double boiler, stirring until smooth. Remove bowl from heat and set aside. Whisk together flour, cocoa powder, baking powder, and salt in a bowl. Beat together butter and brown sugar in another bowl with an electric mixer at medium-high speed until creamy, about 3 minutes. Add eggs 1 at a time, beating well after each addition, then beat in melted chocolate until combined. Add milk and vanilla, beating to incorporate. Reduce speed to low and add flour mixture, mixing until just combined. Stir in nut mixture. Cover bowl with plastic wrap and chill dough until firm, 2 to 3 hours. Form and bake cookies: Put oven racks in upper and lower thirds of oven and preheat oven to 350°F. Line 2 large baking sheets with parchment paper. Sift confectioners sugar into a bowl. Halve dough and chill 1 half, wrapped in plastic wrap. Roll remaining half into 1-inch balls, placing them on a sheet of wax paper as rolled. Roll balls, 3 or 4 at a time, in confectioners sugar to coat generously and arrange 2 inches apart on lined baking sheets. Bake, switching position of sheets halfway through baking, until cookies are puffed and cracked and edges feel dry (but centers are still slightly soft), 12 to 18 minutes total. Transfer cookies to racks to cool completely. While first batch is baking, roll remaining dough into balls. Line cooled cookie sheets with fresh parchment, then coat balls with confectioners sugar and bake in same manner. Cooks' note: Cookies keep, layered between sheets of parchment or wax paper, in an airtight container at room temperature 5 days. |

Cool Tools:
Monday, November 29, 2010
The Best Banana Bundt Cake
I had four bananas that were so ripe that I thought they might turn into goo if I let them go one more day. Usually I would make a banana bread and call it a day. Today I just wasn't feeling it. I was concerned that I might fall asleep from boredom if I made one more banana bread. There had to be something else I could do with the bananas.
I snooped around the internet and found The Best Banana Bundt Cake recipe by Dorie Greenspan. It had great reviews and I had everything I needed in my pantry.
It came out beautifully. A moist cake that was lighter than my usual banana bread. My only issue was, I was so excited to slice and eat it that I forgot to take a picture until much later. So here are photos of less than half the cake!
The Best Banana Bundt Cake
By Dorie Greenspan
Ingredients
- 3 cups all-purpose flour
- 2 teaspoons baking soda
- 1/2 teaspoon salt
- 8 ounces unsalted butter, at room temperature ( 1/2 cup or 2 sticks)
- 2 cups sugar
- 2 teaspoons pure vanilla extract
- 2 large eggs, preferably at room temperature
- about 4 very ripe bananas, mashed ( 1 1/2 - 1 3/4 cups)
- 1 cup plain yogurt (or a combination of the two) or 1 cup sour cream ( or a combination of the two)
Directions
- Center a rack in the oven and preheat to 350°F Generously butter a 9- to 10-inch (12 cup) Bundt pan. (If you use a silicone pan there's no need to butter it.) Don't place the pan on a baking sheet - you want the oven's heat to circulate through the Bundt's inner tube.
- Whisk the flour, baking soda and salt together.
- Working with a stand mixer, preferably fitted with a paddle attachment, or with a hand mixer in a large bowl, beat the butter until creamy. Add the sugar and beat at medium speed until pale and fluffy. Beat in the vanilla, then add the eggs one at a time, beating for about 1 minute after each egg goes inches Reduce the mixer speed to low and mix in the bananas. Finally, mix in half the dry ingredients (don't be disturbed when the batter curdles), all the sour cream and then the rest of the flour mixture. Scrape the batter into the pan, rap the pan on the counter to debubble the batter and smooth the top.
- Bake for 65-75 minutes, or until a thin knife inserted deep into the center of the cake comes out clean. Check the cake after about 30 minutes - if it is browning too quickly, cover it loosely with a foil tent. Transfer the cake to a rack and cool for 10 minutes before unmolding onto the rack to cool to room temperature. If you have time, wrap the cooled cake in plastic and allow it to sit overnight before serving - it's even better the next day.
- OPTIONAL LEMONY WHITE ICING: Sift 3/4 cup confectioners' sugar into a bowl and squeeze in enough fresh lemon juice (start with 2 teaspoons and add more by drops) to make an icing thin enough to drizzle down the Bundt's curves.
- MUFFIN OPTION: Halve the recipe. You can add nuts or chocolate chips. Bake 28-32 minutes. Yields 12 muffins.
Monday, August 9, 2010
Crunchy Top Banana Nut Muffins
Lately I've been making a conscious effort not to waste food. I am proud to report of a "killing of two birds with one stone" incident (I do not actually condone bird killing by the way).
We occasionally have granola for breakfast. Problem is, there is always a large amount of crumbs left at the bottom of the box. So instead of throwing out almost two cups of granola crumbs, I poured them all into a Ziploc bag and vowed to use them in some sort of baking.
Well today I had three super ripe bananas that needed to be used immediately or end up in the trash tomorrow morning. I usually make a banana bread but I thought muffins would be more fun for the kids. Then I remembered those crumbs. What a great crunchy topping they would make!
Crunchy Top Banana Nut Muffins
Adjust the oven rack to the lower-middle position. Preheat oven to 375 degrees F.
Melt the butter. A large glass mixing bowl in the microwave works great. Set aside to cool. In the meantime; whisk the flour, flaxseed, sugar, baking soda and salt together in a separate mixing bowl. Set aside
Add the mashed bananas, sour cream/yogurt, eggs and vanilla to the melted butter bowl. Mix well. Next add the dry ingredients and walnuts to the bowl and fold until just combined. Don't over mix. Pour the mixture into lined muffin pans, a large cookie scoop works well for this.
Mix the granola and tablespoon of sugar together in a bowl.
Sprinkle some of the mixture on top of each muffin.
Bake for 20-25 minutes. If a toothpick comes out clean then they're done. If not, then bake for a few more minutes.
Let cool for 5 minutes. Remove muffins from the pan and place them on a cooling rack.
Cool Tools:
We occasionally have granola for breakfast. Problem is, there is always a large amount of crumbs left at the bottom of the box. So instead of throwing out almost two cups of granola crumbs, I poured them all into a Ziploc bag and vowed to use them in some sort of baking.
Well today I had three super ripe bananas that needed to be used immediately or end up in the trash tomorrow morning. I usually make a banana bread but I thought muffins would be more fun for the kids. Then I remembered those crumbs. What a great crunchy topping they would make!
Crunchy Top Banana Nut Muffins
- 1/2 cup (1 stick) unsalted butter
- 2 eggs (large or extra-large), lightly beaten
- 1/2 cup sour cream or plain yogurt
- 3 LARGE, very ripe bananas, mashed
- 2 tsp vanilla
- 2 cups of flour
- 3 tbsp ground flaxseed meal (optional)
- 3/4 cup sugar
- 3/4 tsp baking soda
- 1/2 tsp salt
- 3/4 cup chopped walnuts or pecans, lightly toasted
- 3/4 cup granola crumbs (or ground up granola)
- 1 tbsp sugar
Adjust the oven rack to the lower-middle position. Preheat oven to 375 degrees F.
Melt the butter. A large glass mixing bowl in the microwave works great. Set aside to cool. In the meantime; whisk the flour, flaxseed, sugar, baking soda and salt together in a separate mixing bowl. Set aside
Add the mashed bananas, sour cream/yogurt, eggs and vanilla to the melted butter bowl. Mix well. Next add the dry ingredients and walnuts to the bowl and fold until just combined. Don't over mix. Pour the mixture into lined muffin pans, a large cookie scoop works well for this.
Mix the granola and tablespoon of sugar together in a bowl.
Sprinkle some of the mixture on top of each muffin.
Bake for 20-25 minutes. If a toothpick comes out clean then they're done. If not, then bake for a few more minutes.
Let cool for 5 minutes. Remove muffins from the pan and place them on a cooling rack.
Cool Tools:
Tuesday, August 3, 2010
Chocolate Chip Pecan Oatmeal Cookies
Here is a variation of those delicious Raisin Pecan Oatmeal Cookies I made the other day. I made them a little less oatmeal-y and substituted chocolate chips for the raisins. A truly awesome cookie!
Chocolate Chip Pecan Oatmeal Cookies
Place the pecans on a sheet pan and bake for 5 minutes, until crisp. You should just start to smell them. Mmmmm! Set aside to cool. Chop very coarsely.
In the bowl of an electric mixer fitted with the paddle attachment or an electric hand mixer, beat the butter, brown sugar, and granulated sugar together on medium-high speed until light and fluffy. With the mixer on low, add the egg and the vanilla.
Sift the flour, flaxseed, baking powder, cinnamon, and salt together into a medium bowl. With the mixer on low, slowly add the dry ingredients to the butter mixture. Add the oats and pecans and mix just until combined. Gently fold in the chocolate chips.
Using a small ice-cream scoop or a tablespoon, drop 2-inch mounds of dough onto sheet pans lined with parchment paper.
Flatten slightly with a damp hand. Bake for 12 to 14 minutes, until lightly browned. Transfer the cookies to a baking rack and cool completely.
Cool Tools:
Chocolate Chip Pecan Oatmeal Cookies
- 1 cup pecans
- 1/4 pound (1 stick) unsalted butter, at room temperature
- 1/2 cup dark brown sugar, lightly packed
- 1/2 cup granulated sugar
- 1 extra-large egg, at room temperature
- 1 teaspoons pure vanilla extract
- 3/4 cup all-purpose flour
- 1 tbsp toasted flaxseed (optional)
- 1/2 teaspoon baking powder
- 1/2 teaspoon ground cinnamon
- 1/2 teaspoon kosher salt
- 1 1/4 cups old-fashioned oatmeal
- 3/4 cup chocolate chips
Directions
Preheat the oven to 350 degrees F.Place the pecans on a sheet pan and bake for 5 minutes, until crisp. You should just start to smell them. Mmmmm! Set aside to cool. Chop very coarsely.
In the bowl of an electric mixer fitted with the paddle attachment or an electric hand mixer, beat the butter, brown sugar, and granulated sugar together on medium-high speed until light and fluffy. With the mixer on low, add the egg and the vanilla.
Sift the flour, flaxseed, baking powder, cinnamon, and salt together into a medium bowl. With the mixer on low, slowly add the dry ingredients to the butter mixture. Add the oats and pecans and mix just until combined. Gently fold in the chocolate chips.
Using a small ice-cream scoop or a tablespoon, drop 2-inch mounds of dough onto sheet pans lined with parchment paper.
Flatten slightly with a damp hand. Bake for 12 to 14 minutes, until lightly browned. Transfer the cookies to a baking rack and cool completely.
Cool Tools:
Saturday, July 24, 2010
Sweet somethings...
For someone who is not much of a baker, I am onto my second baking post in a row. I guess that's the only way you can get better at something...practice, practice, practice!
This afternoon, the kids and I made some Raisin Pecan Oatmeal Cookies. They were amazing! A nice change from our usual chocolate chip.
Raisin Pecan Oatmeal Cookies
Ingredients
nocoupons- 1 1/2 cups pecans
- 1/2 pound (2 sticks) unsalted butter, at room temperature
- 1 cup dark brown sugar, lightly packed
- 1 cup granulated sugar
- 2 extra-large eggs, at room temperature
- 2 teaspoons pure vanilla extract
- 1 1/2 cups all-purpose flour
- 1 teaspoon baking powder
- 1 teaspoon ground cinnamon
- 1 teaspoon kosher salt
- 3 cups old-fashioned oatmeal
- 1 1/2 cups raisins
Directions
Preheat the oven to 350 degrees F.
Place the pecans on a sheet pan and bake for 5 minutes, until crisp. Set aside to cool. Chop very coarsely.
In the bowl of an electric mixer fitted with the paddle attachment, beat the butter, brown sugar, and granulated sugar together on medium-high speed until light and fluffy. With the mixer on low, add the eggs, one at a time, and the vanilla.
Sift the flour, baking powder, cinnamon, and salt together into a medium bowl. With the mixer on low, slowly add the dry ingredients to the butter mixture. Add the oats, raisins, and pecans and mix just until combined.
Using a small ice-cream scoop or a tablespoon, drop 2-inch mounds of dough onto sheet pans lined with parchment paper. Flatten slightly with a damp hand. Bake for 12 to 15 minutes, until lightly browned. Transfer the cookies to a baking rack and cool completely.
Cool Tools:
Place the pecans on a sheet pan and bake for 5 minutes, until crisp. Set aside to cool. Chop very coarsely.
In the bowl of an electric mixer fitted with the paddle attachment, beat the butter, brown sugar, and granulated sugar together on medium-high speed until light and fluffy. With the mixer on low, add the eggs, one at a time, and the vanilla.
Sift the flour, baking powder, cinnamon, and salt together into a medium bowl. With the mixer on low, slowly add the dry ingredients to the butter mixture. Add the oats, raisins, and pecans and mix just until combined.
Using a small ice-cream scoop or a tablespoon, drop 2-inch mounds of dough onto sheet pans lined with parchment paper. Flatten slightly with a damp hand. Bake for 12 to 15 minutes, until lightly browned. Transfer the cookies to a baking rack and cool completely.
Cool Tools:
Friday, July 23, 2010
Romancing the plum...
I love to read cooking magazines. My favorites are the ones with beautiful photos and art direction. Oh, and of course tempting recipes. I enjoy them like a good romance novel. Except the love affair is with food!
While flipping through the latest Martha Stewart Living the other day, I came across the most charming looking cake. The whole cake was cooked in a cast iron pan/skillet and had fresh plums fanned across the top. It seemed old-fashioned and almost...romantic!
I asked my almost-too-good-to-be-true mother-in-law to assist me with the skillet cake while I finished making dinner. Well before you know it, she was done and I hadn't done a thing to help.
We served it warm with a scoop of vanilla ice cream. The plums added a little tartness and the cake was soft in the middle, crispier towards the edge. It was wonderful. Thanks, Mom!
Plum Skillet Cake
Martha Stewart Living, August 2010
Pour batter into prepared skillet and smooth top with an offset spatula.
Fan plums on top, and sprinkle with remaining 2 tablespoons sugar. Bake until golden brown and a toothpick inserted in the center comes out clean, 35 to 40 minutes. Let cool slightly.
Cut into 6-8 wedges.
Cool Tools:
While flipping through the latest Martha Stewart Living the other day, I came across the most charming looking cake. The whole cake was cooked in a cast iron pan/skillet and had fresh plums fanned across the top. It seemed old-fashioned and almost...romantic!
I asked my almost-too-good-to-be-true mother-in-law to assist me with the skillet cake while I finished making dinner. Well before you know it, she was done and I hadn't done a thing to help.
We served it warm with a scoop of vanilla ice cream. The plums added a little tartness and the cake was soft in the middle, crispier towards the edge. It was wonderful. Thanks, Mom!
Plum Skillet Cake
Martha Stewart Living, August 2010
- 4 tbsp unsalted butter, room temperature, plus more for skillet
- 1 cup all-purpose flour, plus more for skillet
- 1/2 tsp baking powder
- 1/4 tsp baking soda
- 1/2 tsp coarse salt
- 3/4 cup plus 2 tablespoons sugar
- 1 large egg
- 1/2 cup low-fat buttermilk
- 2 ripe medium plums, thinly sliced
Pour batter into prepared skillet and smooth top with an offset spatula.
Fan plums on top, and sprinkle with remaining 2 tablespoons sugar. Bake until golden brown and a toothpick inserted in the center comes out clean, 35 to 40 minutes. Let cool slightly.
Cut into 6-8 wedges.
Cool Tools:
Sunday, June 27, 2010
That's the way the cookie crumbles...
My hubby lost a bet to a friend and the payment was two dozen chocolate chip and walnut cookies. His loss was our gain (sorry honey!). We quickly ate the dozen or so extra. Darn good cookies!
SLICE AND BAKE COOKIE VARIATION:
PREPARE dough as above. Divide in half; wrap in waxed paper. Refrigerate for 1 hour or until firm. Shape each half into 15-inch log; wrap in wax paper. Refrigerate for 30 minutes.* Preheat oven to 375° F. Cut into 1/2-inch-thick slices; place on ungreased baking sheets. Bake for 8 to 10 minutes or until golden brown. Cool on baking sheets for 2 minutes; remove to wire racks to cool completely. Makes about 5 dozen cookies.
* May be stored in refrigerator for up to 1 week or in freezer for up to 8 weeks.
FOR HIGH ALTITUDE BAKING (5,200 feet): Increase flour to 2 1/2 cups. Add 2 teaspoons water with flour and reduce both granulated sugar and brown sugar to 2/3 cup each. Bake drop cookies for 8 to 10 minutes and pan cookie for 17 to 19 minutes.
Nestle Tollhouse Cookies
- 2 1/4 cups all-purpose flour
- 1 teaspoon baking soda
- 1 teaspoon salt
- 1 cup (2 sticks) butter, softened
- 3/4 cup granulated sugar
- 3/4 cup packed brown sugar
- 1 teaspoon vanilla extract
- 2 large eggs
- 2 cups (12-oz. pkg.) Semi-sweet chocolate chips
- 1 cup chopped walnuts, lightly toasted
Directions
PREHEAT oven to 375° F.
COMBINE flour, baking soda and salt in small bowl. Beat butter, granulated sugar, brown sugar and vanilla extract in large mixer bowl until creamy. Add eggs, one at a time, beating well after each addition. Gradually beat in flour mixture. Stir in morsels and nuts. Drop by rounded tablespoon onto ungreased baking sheets.
BAKE for 9 to 11 minutes or until golden brown. Cool on baking sheets for 2 minutes; remove to wire racks to cool completely.SLICE AND BAKE COOKIE VARIATION:
PREPARE dough as above. Divide in half; wrap in waxed paper. Refrigerate for 1 hour or until firm. Shape each half into 15-inch log; wrap in wax paper. Refrigerate for 30 minutes.* Preheat oven to 375° F. Cut into 1/2-inch-thick slices; place on ungreased baking sheets. Bake for 8 to 10 minutes or until golden brown. Cool on baking sheets for 2 minutes; remove to wire racks to cool completely. Makes about 5 dozen cookies.
* May be stored in refrigerator for up to 1 week or in freezer for up to 8 weeks.
FOR HIGH ALTITUDE BAKING (5,200 feet): Increase flour to 2 1/2 cups. Add 2 teaspoons water with flour and reduce both granulated sugar and brown sugar to 2/3 cup each. Bake drop cookies for 8 to 10 minutes and pan cookie for 17 to 19 minutes.
Monday, June 21, 2010
Pan cookies...
Thank you to my hubby for making these! Mmmmmm so good!!!
Original Nestle® Toll House® Chocolate Chip Pan Cookie
Ingredients
- 2 1/4 cups all-purpose flour
- 1 teaspoon baking soda
- 1 teaspoon salt
- 1 cup butter, softened
- 3/4 cup granulated sugar
- 3/4 cup packed brown sugar
- 1 teaspoon vanilla extract
- 2 large eggs
- 1 (12 ounce) package NESTLE® TOLL HOUSE® Semi-Sweet Chocolate Morsels
Directions
- PREHEAT the oven to 375 degrees F (190 degrees C). Grease a 10x15 inch jelly roll pan.
- COMBINE flour, baking soda and salt in small bowl. Beat butter, granulated sugar, brown sugar and vanilla extract in large mixer bowl. Add eggs one at a time, beating well after each addition. Gradually beat in flour mixture. Stir in morsels and nuts. Spread into greased 15 x 10-inch jelly-roll pan.
- BAKE for 20 to 25 minutes in the preheated oven, or until golden brown. Cool in pan on a wire rack, then cut into bars.
Monday, June 7, 2010
Tropical paradise...
I love tropical flavors. Spicy jerk chicken, fresh mango, piña coladas, coconut anything really. I thought I'd add a tropical twist to my banana bread today.
This may be my new way to do banana bread. So good! I can't wait to put some vanilla ice cream on a warm piece for dessert.
Coconut and Rum Banana Bread
Melt the butter in a large glass mixing bowl. Microwave works great. Set aside to cool. In the meantime, whisk the flour, coconut, sugar, baking soda and salt together in a separate mixing bowl. Set aside
Add the mashed bananas, yogurt, eggs and vanilla to the cooled melted butter bowl. Mix well. Next add the dry ingredients to the bowl and fold until just combined. Don't over mix. Pour the mixture into the loaf pan. Bake for 55 minutes. If a toothpick comes out clean then it's done. If not then bake for a few more minutes.
When the loaf has cooled down enough to handle, gently remove from the pan and put it on a cooling rack.
Cool Tools:
This may be my new way to do banana bread. So good! I can't wait to put some vanilla ice cream on a warm piece for dessert.
Coconut and Rum Banana Bread
- 6 tbsp (3/4 stick) unsalted butter
- 2 eggs (I use extra-large but large is fine too), beaten
- 1/2 cup vanilla yogurt (plain would work)
- 3 large or 4 small, very ripe bananas; mashed
- 1 1/2 tsp rum extract
- 2 cups of all purpose flour
- 3/4 cup sugar
- 3/4 tsp baking soda
- 1/2 tsp salt
- 1 cup sweetened shredded coconut (baking aisle)
Melt the butter in a large glass mixing bowl. Microwave works great. Set aside to cool. In the meantime, whisk the flour, coconut, sugar, baking soda and salt together in a separate mixing bowl. Set aside
Add the mashed bananas, yogurt, eggs and vanilla to the cooled melted butter bowl. Mix well. Next add the dry ingredients to the bowl and fold until just combined. Don't over mix. Pour the mixture into the loaf pan. Bake for 55 minutes. If a toothpick comes out clean then it's done. If not then bake for a few more minutes.
When the loaf has cooled down enough to handle, gently remove from the pan and put it on a cooling rack.
Cool Tools:
Wednesday, March 31, 2010
Mint condition...
If any of you have ever grown mint in your garden, you know that it can get out of control. My hubby was clearing out the overgrowth of mint in our backyard and didn't have the heart to throw it all out. His brilliant solution? Mint chocolate chip ice cream. Just when I thought I couldn't love him more!
The recipe we used is from simplyrecipes.com. It was a little more work than making the non-custard type ice cream but not difficult. The ice cream came out very rich and perfectly sweet. There was a mintiness to it but not at all like the store-bought variety, more subtle and natural. Instead of a semisweet or dark chocolate, I chopped up the milk chocolate chips I had in the cupboard. It turned out pretty tasty. Not the be-all end-all but really good. There is something charming about cooking with things that grow in your backyard.
Mint Chocolate Chip Ice Cream
Note that if you do not have fresh mint, you can make this mint chocolate chip ice cream recipe with peppermint extract. Skip steps 1 and 2, instead heating 1 cup of milk with 1 cup of cream and the sugar and salt until steaming. Continue with step 3. Add 2 teaspoons of peppermint extract in with the chilled custard mixture in step 6.
The recipe we used is from simplyrecipes.com. It was a little more work than making the non-custard type ice cream but not difficult. The ice cream came out very rich and perfectly sweet. There was a mintiness to it but not at all like the store-bought variety, more subtle and natural. Instead of a semisweet or dark chocolate, I chopped up the milk chocolate chips I had in the cupboard. It turned out pretty tasty. Not the be-all end-all but really good. There is something charming about cooking with things that grow in your backyard.
Mint Chocolate Chip Ice Cream
Note that if you do not have fresh mint, you can make this mint chocolate chip ice cream recipe with peppermint extract. Skip steps 1 and 2, instead heating 1 cup of milk with 1 cup of cream and the sugar and salt until steaming. Continue with step 3. Add 2 teaspoons of peppermint extract in with the chilled custard mixture in step 6.
Ingredients
- 3 cups of fresh mint leaves (not stems), rinsed, drained, packed
- 1 cup milk
- 2 cups heavy cream (divided, 1 cup and 1 cup)
- 2/3 cup sugar
- A pinch of salt
- 6 egg yolks
- 6 ounces semisweet chocolate or dark chocolate, chopped fine, keep in the freezer until used
Method
1 Put the mint leaves in a heavy saucepan with the 1 cup of milk and 1 cup of the cream. Heat until just steaming (do not let boil), remove from heat, cover, and let stand for 30 minutes. Reheat the mixture until steaming, remove from heat and let stand for 15 more minutes.2 While the mint is infusing in step 1, prepare the remaining cream over an ice bath. Pour the remaining 1 cup of cream into a medium size metal bowl, set in ice water (with lots of ice) over a larger bowl. Set a mesh strainer on top of the bowls. Set aside.
3 Strain the milk cream mixture into a bowl, pressing against the mint leaves with a rubber spatula in the sieve to get the most liquid out of them. Return the milk cream mixture to the saucepan. Add sugar and salt to the mixture. Heat until just steaming again, stirring until sugar has dissolved. Remove from heat.
4 Whisk the egg yolks in a medium sized bowl. Slowly pour the heated milk cream mixture into the egg yolks, whisking constantly so that the egg yolks are tempered by the warm mixture, but not cooked by it. Scrape the warmed egg yolks back into the saucepan.
5 Return the saucepan to the stove, stirring the mixture constantly over medium heat with a wooden spoon, scraping the bottom as you stir, until the mixture thickens and coats the spoon so that you can run your finger across the coating and have the coating not run. This can take about 10 minutes.
If the custard base does not coat the back of the spoon, it is not ready.
When the custard base coats the back of the spoon, you can run your finger across the coating and have it not run. It is ready and should be removed from heat immediately, and poured through the sieve over the ice bath to stop the cooking.
6 Pour the custard through the strainer (from step 2) and stir into the cold cream to stop the cooking.
7 Chill the mixture thoroughly in the refrigerator (at least a couple of hours) or stir the mixture in the bowl placed over the ice bath until thoroughly chilled (20 minutes or so). Freeze the mixture in your ice cream maker according to the manufacturer's instructions.
8 Once the ice cream has been made in the ice cream maker it should be pretty soft. Gently fold in the finely chopped chocolate. Put in an airtight container and place in the freezer for at least an hour, preferably several hours. If it has been frozen for more than a day, you may need to let it sit at room temperature for a few minutes to soften it before serving.
Note that there is no alcohol in this recipe. A few teaspoons of some spirits such as rum or bourbon will help keep the ice cream soft over several days. Even the alcohol in vanilla extract will help. If you have no added alcohol in a homemade ice cream recipe, we recommend that you eat it up quickly, in a day or two; beyond that point the ice cream will quickly get very very hard.
Makes 1 quart.
Cool Tools:
Thursday, March 11, 2010
Cookie monster...
I'm always looking for new cookie recipes to try. I'd like to say I make cookies for the kids but in all honesty, it's my hubby and I that eat most of them. Finding a really good chocolate chip cookie recipe is not as easy as one would think. There are hundreds of recipes floating around. Some are too soft, some too crispy, some not chewy enough. I've yet to find the perfect, "Holy Grail" of chocolate chip cookies.
Here's a recipe I found on Smitten Kitchen , a great blog written by this woman Deb. She is an outstanding photographer, writer and chef. Her blog is what I hope mine can be one day. I sort of have a blog crush on it! In the meantime, she is an inspiration. We all need that in life.
I wanted to try this recipe mainly because her photos made me salivate on the spot. Also, they were described as "crispy, chewy" and that's exactly how I like my cookies to be. I used Ghirardelli milk chocolate chips instead of semisweet ones. I also had to cook mine a few minutes longer than the recipe. It all depends on your oven I guess. I also made some without the chocolate chips for my son who is not a chocolate lover. Where did he come from?
Well they were indeed crispy AND chewy. I brought them to a parents' meeting and everyone loved them. These may be my go to recipe from now on.
Crispy, Chewy Chocolate Chip Cookies
Adapted by Smitten Kitchen from AllRecipes.com
2 cups all-purpose flour
1/2 teaspoon baking soda
1/2 teaspoon salt
3/4 cup unsalted butter, melted
1 cup packed brown sugar
1/2 cup white sugar
1 tablespoon vanilla extract
1 egg
1 egg yolk
2 (I used only 1) cups semisweet chocolate chips
1. Preheat the oven to 325°F (165°C). Grease cookie sheets or line with parchment paper.
2. Sift together the flour, baking soda and salt; set aside. In a medium bowl, cream together the melted butter, brown sugar and white sugar until well blended.
3. Beat in the vanilla, egg, and egg yolk until light and creamy. Mix in the sifted ingredients until just blended.
4. Stir in the chocolate chips by hand using a wooden spoon. Drop cookie dough 1/4 cup at a time (for giant cookies) or a tablespoon at a time (for smaller cookies) onto the prepared cookie sheets. Cookies should be about 3 inches apart.
5. Bake larger cookies for 15 to 17 minutes, or 10 to 12 minutes for smaller ones (check your cookies before they’re done; depending on your scoop size, your baking time will vary) in the preheated oven, or until the edges are lightly toasted. Cool on baking sheets for a few minutes before transferring to wire racks to cool completely.
Cool Tools:
Here's a recipe I found on Smitten Kitchen , a great blog written by this woman Deb. She is an outstanding photographer, writer and chef. Her blog is what I hope mine can be one day. I sort of have a blog crush on it! In the meantime, she is an inspiration. We all need that in life.
I wanted to try this recipe mainly because her photos made me salivate on the spot. Also, they were described as "crispy, chewy" and that's exactly how I like my cookies to be. I used Ghirardelli milk chocolate chips instead of semisweet ones. I also had to cook mine a few minutes longer than the recipe. It all depends on your oven I guess. I also made some without the chocolate chips for my son who is not a chocolate lover. Where did he come from?
Well they were indeed crispy AND chewy. I brought them to a parents' meeting and everyone loved them. These may be my go to recipe from now on.
Crispy, Chewy Chocolate Chip Cookies
Adapted by Smitten Kitchen from AllRecipes.com
2 cups all-purpose flour
1/2 teaspoon baking soda
1/2 teaspoon salt
3/4 cup unsalted butter, melted
1 cup packed brown sugar
1/2 cup white sugar
1 tablespoon vanilla extract
1 egg
1 egg yolk
2 (I used only 1) cups semisweet chocolate chips
1. Preheat the oven to 325°F (165°C). Grease cookie sheets or line with parchment paper.
2. Sift together the flour, baking soda and salt; set aside. In a medium bowl, cream together the melted butter, brown sugar and white sugar until well blended.
3. Beat in the vanilla, egg, and egg yolk until light and creamy. Mix in the sifted ingredients until just blended.
4. Stir in the chocolate chips by hand using a wooden spoon. Drop cookie dough 1/4 cup at a time (for giant cookies) or a tablespoon at a time (for smaller cookies) onto the prepared cookie sheets. Cookies should be about 3 inches apart.
5. Bake larger cookies for 15 to 17 minutes, or 10 to 12 minutes for smaller ones (check your cookies before they’re done; depending on your scoop size, your baking time will vary) in the preheated oven, or until the edges are lightly toasted. Cool on baking sheets for a few minutes before transferring to wire racks to cool completely.
Cool Tools:
Sunday, March 7, 2010
A series of fortunate events...
One of my dearest friends invited me over to her place for dinner. She's a fantastic cook so I was very excited to take a night off from cooking. I was in charge of dessert which was probably not the best idea. I may have mentioned this before...I'm a terrible baker! I found out that her boyfriend was a lover of all things lemon so that narrowed things down tremendously.
I decided to go with lemon bars. Seemed easy enough and there was little room for errors. I made half the recipe and used an 8 inch square baking pan. The cooking time for the crust I increased by a couple of minutes. I am also a fan of lemony goodness so I kept the amount of zest at 1 tablespoon. Writing this, I am starting to see why I suck at baking. With cooking, you can add a dash of this and substitute with that. Baking is very precise. I'm pretty sure it's my alterations that get me into trouble.
So the lemon bars turned out very thin but quite delicious. They weren't going to win any beauty contests but good enough to take over to the dinner party. And for my baking skills, that's a step forward.
Preparation
Preheat oven to 350°F. Combine 1 1/2 cups flour and 1/2 cup powdered sugar in large bowl.
Add butter and cut in until mixture resembles coarse meal.
Press mixture into bottom of 9x13x2-inch baking dish. Bake until golden brown, about 20 minutes. Remove from oven. Maintain oven temperature.
Beat eggs, 1 1/2 cups sugar, lemon juice, 1 tablespoon plus 1 teaspoon flour and lemon peel in medium bowl to blend. Pour into crust. Bake until mixture is set, about 20 minutes. Cool.
Cut into 24 bars. Sift powdered sugar over top before serving.
I decided to go with lemon bars. Seemed easy enough and there was little room for errors. I made half the recipe and used an 8 inch square baking pan. The cooking time for the crust I increased by a couple of minutes. I am also a fan of lemony goodness so I kept the amount of zest at 1 tablespoon. Writing this, I am starting to see why I suck at baking. With cooking, you can add a dash of this and substitute with that. Baking is very precise. I'm pretty sure it's my alterations that get me into trouble.
So the lemon bars turned out very thin but quite delicious. They weren't going to win any beauty contests but good enough to take over to the dinner party. And for my baking skills, that's a step forward.
Double Lemon Bars
Bon Appétit | July 1991
by Lana Sills: North Hollywood, California
yield: Makes 24
Ingredients
- 1 1/2 cups all purpose flour
- 1/2 cup powdered sugar
- 3/4 cup (1 1/2 sticks) butter, cut into pieces, room temperature
- 4 eggs
- 1 1/2 cups sugar
- 1/2 cup fresh lemon juice
- 1 tablespoon plus 1 teaspoon all purpose flour
- 1 tablespoon grated lemon peel
- Powdered sugar
Preheat oven to 350°F. Combine 1 1/2 cups flour and 1/2 cup powdered sugar in large bowl.
Add butter and cut in until mixture resembles coarse meal.
Press mixture into bottom of 9x13x2-inch baking dish. Bake until golden brown, about 20 minutes. Remove from oven. Maintain oven temperature.
Beat eggs, 1 1/2 cups sugar, lemon juice, 1 tablespoon plus 1 teaspoon flour and lemon peel in medium bowl to blend. Pour into crust. Bake until mixture is set, about 20 minutes. Cool.
Cut into 24 bars. Sift powdered sugar over top before serving.
Thursday, February 25, 2010
On Blueberry Hill...
I found this recipe online when I Googled "best blueberry muffins". I didn't have fresh blueberries but there were some organic wild blueberries in my freezer. I defrosted them, drained most of their juice and used them in place of the fresh blueberries. I also thought the crumb topping was adding too much extra sugar and butter to a recipe that already had plenty of both to start with. For the crumb topping, I reduced the measurements to 1/8 cup of flour, a little more than 1/8 cup of sugar, 2 tablespoons of butter and 1 teaspoon of cinnamon. I have to say, they were pretty to die for.
- 1 1/2 cups all-purpose flour
- 3/4 cup white sugar
- 1/2 teaspoon salt
- 2 teaspoons baking powder
- 1/3 cup vegetable oil
- 1 egg
- 1/3 cup milk
- 1 cup fresh blueberries
- 1/2 cup white sugar
- 1/3 cup all-purpose flour
- 1/4 cup butter, cubed
- 1 1/2 teaspoons ground cinnamon
Directions
- Preheat oven to 400 degrees F (200 degrees C). Grease muffin cups or line with muffin liners.
- Combine 1 1/2 cups flour, 3/4 cup sugar, salt and baking powder. Place vegetable oil into a 1 cup measuring cup; add the egg and enough milk to fill the cup. Mix this with flour mixture. Fold in blueberries. Fill muffin cups right to the top, and sprinkle with crumb topping mixture.
- To Make Crumb Topping: Mix together 1/2 cup sugar, 1/3 cup flour, 1/4 cup butter, and 1 1/2 teaspoons cinnamon. Mix with fork, and sprinkle over muffins before baking.
- Bake for 20 to 25 minutes in the preheated oven, or until done.
Subscribe to:
Posts (Atom)